2. Methods
2.1 Equipment
We require the following materials for the construction of the vertical garden:
Plant holder:
Container of 33 cm x 23cm x 21cm x1
Acrylic box of 24.6cm x 46cm x 9.5cm x1
Precut sponges of 19.5cm x 11.8cm x4
PVC pipes of length 4.5cm, diameter of 20mm x2
Wooden plank of length 60cm, thickness 1.3cm, height of 7.8cm x2
Steel brackets x2
Young spinach plants x60
Irrigation system:
Submersible water pump of flow rate 520l/h, maximum pump height of 1m, power consumption of 8W (refer to Figure B) x1
Interval timer (at least 12 hours) x1
Liquid nitrogen-rich plant nutrient solution (bottle) x1
Rubber hose of length 44.5cm and diameter 1cm x1
Irrigation tubing of 32.5cm with 9 holes of diameter 0.4cm x1
Thread tape x1
Lighting system:
Interval timer (at least 12 hours) x1
T5 LED lamp of length 30.5cm, power consumption of 8W x1
Acrylic piece of length 27.5cm, breadth of 6.5cm
Masking tape x1
Apparatus:
Hot glue gun (at least 10 tubes of glue) x2
Scissors (pair) x4
Pliers (pair) x4
Metal rule (30cm) x2
Plastic rule (15cm) x1
Electrical drill x1
Double-sided waterproof masking tape x2
Coping saw x2
Measuring cup (at least 100ml) x1
Stirrer x1
Vernier Caliper x1
2.2 Diagram

Figure 2.2.1 - Water pump
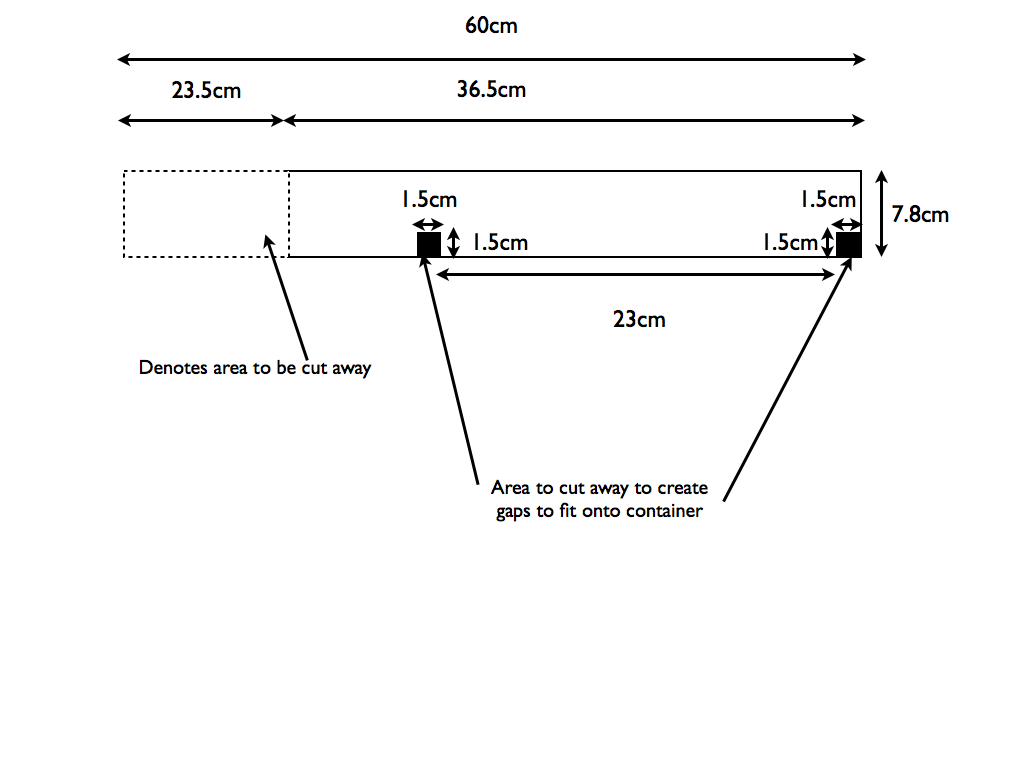
Figure 2.2.2 - Wooden plank
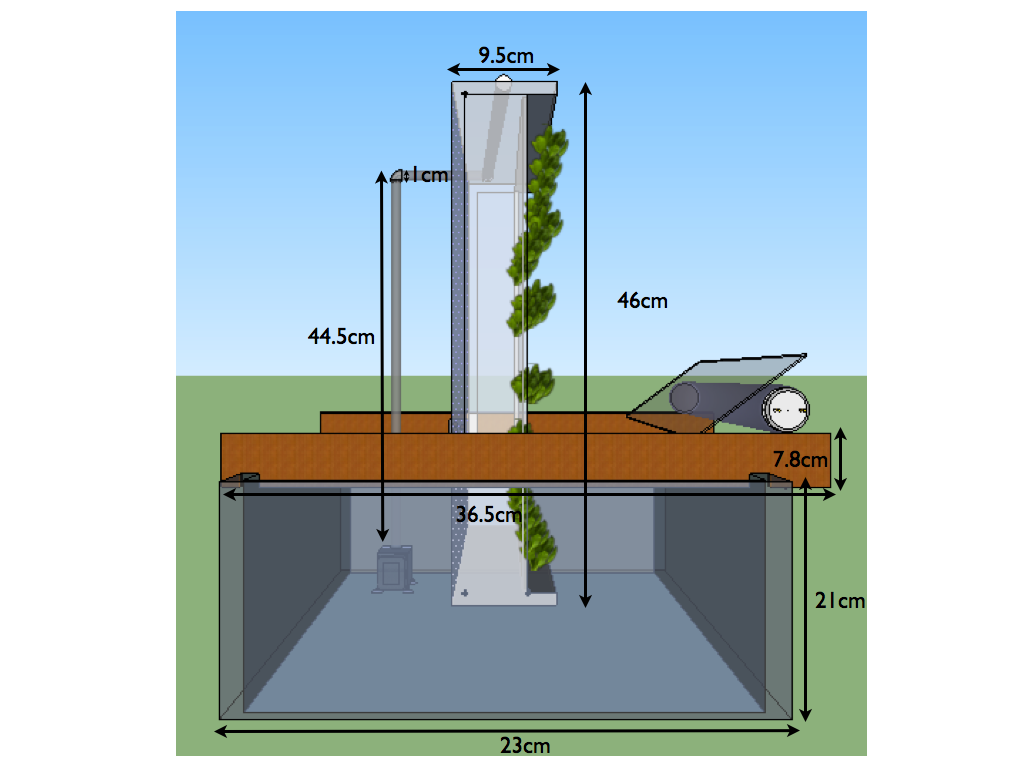
Figure 2.2.3 - Side view of structure

Figure 2.2.4 - Top view of structure
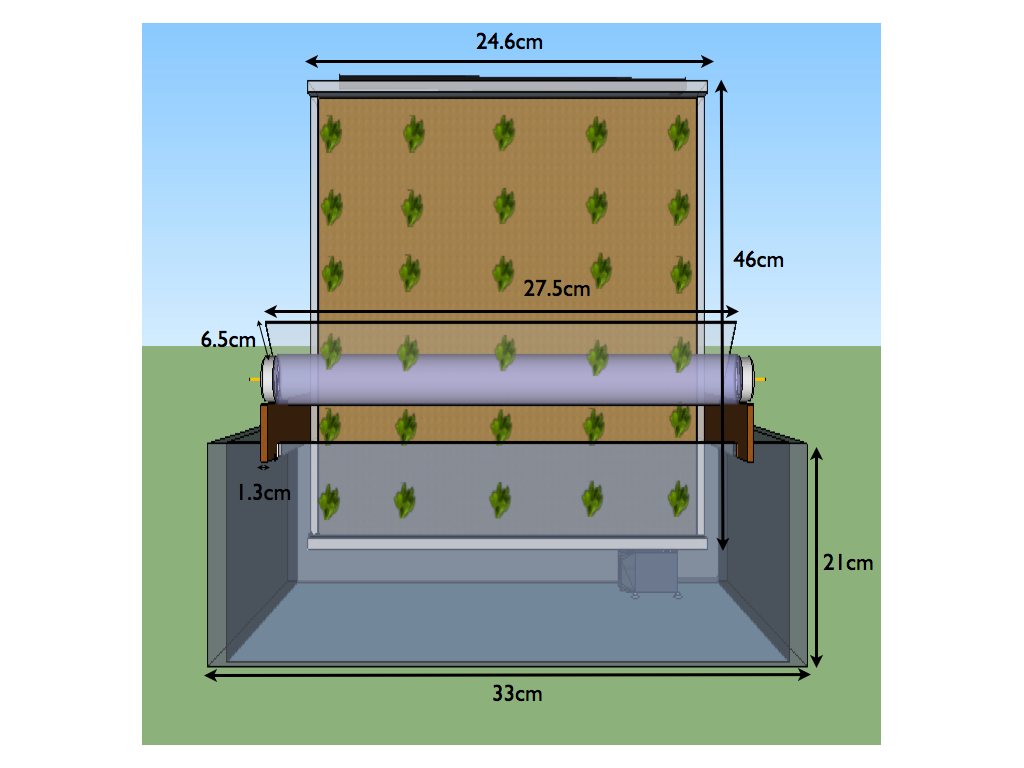
Figure 2.2.5 - Front view of structure
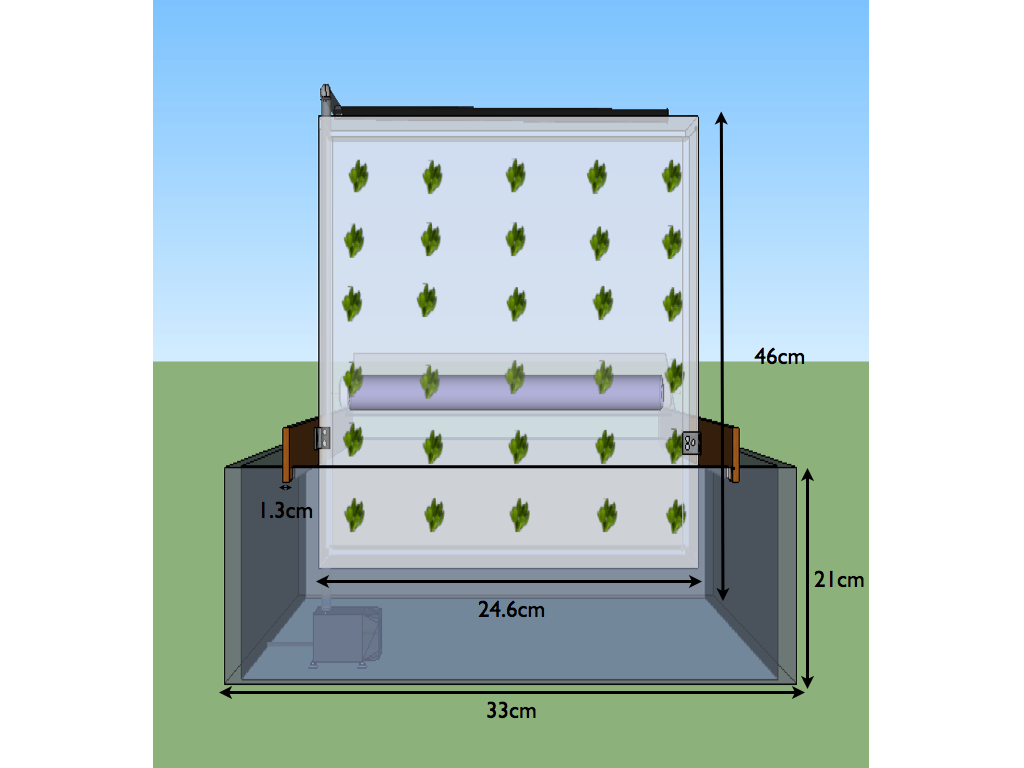
Figure 2.2.6 - Back view of structure

Figure 2.2.7 - Arrangement of plants (front view)
2.3 Procedures
1. Drill 9 holes of diameter 0.4cm at the top of the acrylic box, with a distance of 2.5cm between each one. This will be the holes for the insertion of the irrigation pipes.
2. Proceed to drill another 3 holes of diameter 0.5cm at the bottom, with a distance of 6.5cm between each one. These holes are meant for drainage of water.
3. Connect the 2 PVC pipes of diameter 2cm and length of 4.5cm vertically to the bottom of the acrylic box. Ensure that they are 6.5cm apart. This serves to elevate the acrylic plant holder above water level.
4. Acquire wooden plank of length 60cm, thickness 1.3cm and height of 7.8cm. Saw them into a length of 36.5cm. On one side of the plank, cut two squares of length and breadth 1.5cm, one at the corner and the other 23cm away. These squares will aid in holding the planks onto the container. Refer to Figure C for details.
5. Place the acrylic box into the container, making sure that the pipes under the box touch the container’s base. Ensure that the box is upright by seeing that there are 9 holes at the top.
6. Secure the 2 wooden planks onto the rim of the container. Ensure they span from both of the container’s lengths. The area which had squares cut out should fit snugly onto the rim.
7. With the acrylic box upright and the planks secured, make sure that the planks touch the sides of the acrylic box. There should be an absence of gaps. In front of the acrylic box, there should be excess, protruding wood.
8. Apply hot glue onto both sides of the 2 brackets. Quickly stick the brackets onto the back of the acrylic box and on the surface of the plank beside it. Wait for a minute for it to cool down.
9. Fit 4 sponges of length 19.5cm and breadth of 11.8cm into the acrylic box. Use a scissors to cut them to fit all snugly within the area of the box.
10. Fill the container with water, to a water level of about 7.5cm. If not, make sure the water level does not go above the base of the acrylic box. The volume of water present should be approximately 5.69 litres.
11. Prepare the irrigation system. Acquire an irrigation tubing of length 32.5cm with 9 holes of diameter 0.4cm and a rubber hose of length 44.5cm and diameter 1cm
12. Connect one end of the rubber hose to one end of the irrigation tubing. If it does not fit tightly, use a few rounds of thread tape to tighten it. The other end of the rubber hose goes into the submersible pump.
13. Insert the 9 holes of the irrigation tubing into the 9 holes at the top of the irrigation box. After securing the irrigation tubing, submerge the pump into the container. The suction cups beneath the pump should stick to the base of the container.
14. Since the volume of water is approximately 5.69 litres, 50ml of nutrient solution should be added. Use a measuring cup to aid in this. After adding, proceed to stir the water using a stirrer to ensure that the solution is properly dissolved. Repeat this step everyday.
15. Add the spinach saplings into the sponges. Refer to Figure E.
As seen earlier, there was an extrusion of wood at the front of the acrylic box. Place the T5 LED lamp of length 30.5cm on the protruding wood 18.5cm away from the front of the acrylic box.
16. Secure the lamp to the protruding wood plank with masking tape. Proceed to tape an acrylic piece of length 27.5cm, breadth of 6.5cm on top of the lamp, so as to prevent any water from splashing onto it. Make sure it acts as a flap, with tapes serving as “hinges”.
17. Acquire the two interval timers. Do note that for both the pump and the lamp, they have different settings. For the pump, set the intervals to 6 hours. Set it so that it turns on for half an hour only. The pump would then only function every 6 hours for half an hour.
18. The interval for the lamp is also 6 hours. However, set it so that at every interval, the lamp turns off for 1 hour. The light would then only turn off every 6 hours for 1 hour at a time.
2.4 Risk Assessment and Management
We may scald our fingers when operating the glue gun, as the device requires high heat in order to function. Using a wood saw to cut wood is hazardous as one may cut his/her fingers when in use. Wood shavings and plastic residue from drilling may also irritate our eyes as they are light and airborne (Mayo Clinic, 2009). Our fingers may also be cut due to improper and unsafe use of pliers and scissors.
During use a glue gun, we will make sure that the tip is out of range from our fingers, to prevent any burns or scalding. If the glue gun is not in use, we will turn it off to prevent it from overheating. We will position our hands away from the drill when drilling, saw when sawing and make sure that the activity is done under close supervision and on a stable surface (concrete top). This helps to prevent any accidental image to property such as tables. Airborne particles such as plastic residue and wood shaving may affect our eyes (Mayo Clinic, 2009), hence it would be recommended to wear safety goggles, as a precaution. Our fingers would have to be positioned further from the blade when using scissors and pliers especially.
All wood shavings, dust and plastic residue should be collected and disposed off in a bin properly, to prevent any shavings contaminating the air around the area. Wood fragments and plastic residue have the potential to injure us, hence they should be placed in a puncture-proof container such as bucket or bin (Brown, 2009). We would also use cutting mats and corrugated plastic to prevent any damage to other surfaces (table tops).
2.5 Data Analysis
After construction, we will start growing the plants in the vertical garden. At the same time we will build two constants. Firstly, grow the plants into a separate pot with soil, water and lighting. Secondly, grow another batch in sponges similar to the ones used in the vertical garden. With this small plot, they will be given water infused with nutrient solution (5ml per litre) and roughly the same amount of light.
To test the rate of water flow in our vertical garden, we will pour water in from the top of the acrylic box (side with 9 holes) and wait for the water to flow down the acrylic box (towards the side with 3 holes). We will calculate the time in which it takes for the water to flow through the entire set up.
We will also test whether sponges are able to prevent water from evaporating faster than uncovered water. We will place 7.39ml of water each in 2 measuring cups. One cup would have a sponge soaked in it. We will leave the two cups in the same conditions as the vertical garden for 21 hours.
Finally, we would measure the growth of the plants by measuring the height of the stalks and taking the average. We will measure the tallest stalk from the surface of the sponge or soil all the way to the tip of the highest leaf. A string may be required and the measurements apply for the vertical garden, sponge constant and soil constant. Refer to Figures F, G, H.
No comments:
Post a Comment